
So this week, Brad and I worked on making sure I had a solid development environment to be building plugins in the first place. Fortunately, when it comes to plugin development and theme development (something I do fairly often) there’s a lot of overlap.
Brad’s article is excellent for those who want to actually make stuff that works in WordPress, not just play in the WordPress administrative backend. Honestly, that’s kind of one of the first real stages in advancing your trade as a front-end developer as well. You may have fiddled with all the hidden settings in the WP backend, and have gotten really comfortable with that. But at some point you start to feel like the backend kind of gets in the way of what you really want to do, or you feel like you need to create something from scratch and upload it to the backend rather than just tweak what others have given you. If either of those “itches” are familiar, then this setup is a pretty good way to start scratching.

I think Brad’s major concern here — as is most any professional developer’s — is that you are creating in an environment that is efficient and reliable. The last thing you want while creating your plugin is to overwrite stuff you shouldn’t have and have no way back. The last thing you want to do is be pushing this wild and zany thing out to the world in a way that might cause damage to others and your own reputation. Sorry, Chuck, your round-house kick might just get us all in a ton of trouble this time!
So this is Brad’s outline for Step 1: Setting up Your Environment. Get all the details here.
- Install WordPress locally
- Turn On WordPress debugging
- Choose which source control to use
- Learn WordPress core concepts
- Choose a good IDE (optional)
- Setup IDE debugging (optional)
Install WordPress Locally
Brad also works on a Windows machine but setup his local environment a bit differently than I have. But, he assured me that my setup is great too. Whew! I use Xampp. It’s awesome out of the box, and I’ve also installed Ruby, Ruby Rails, Jekyll, and Sass in my Xampp directory in order to execute all kinds of local server awesomeness. Now, do I REALLY know what all that does? Not really. All I know is that I’ve used these tools to get some work done for a variety of clients and they’re great.
This is what I recommend if you’re on Windows and need a local server environment:
- Install Xampp with their default installer. They suggest you install it in your root “C:\” folder so that it says C:\xampp. That’s what I did.
- Open the Control Panel and start Apache and MySql
- Go into your “htdocs” folder and add a folder with an obvious name, like “clients”, or “development”.
- Make another folder in that called “plugin”. And copy WordPress 3.6 right into there. Might as well develop on that right now since it’s release is imminent.
- Go into your browser and type “localhost” (without quotes). This should give you the Xampp welcome page. In the far left menu towards the bottom hit “phpmyAdmin”
- Create a database called “plugins”. I typically just create a user with root and no password. Someone in the comments should call me crazy for that, but I don’t see a point in saving and creating strong passwords for my local environment (call me crazy!).
- Go in your browser and type “localhost/development/plugin” and BLAMO! You’re at your WordPress install screen and can install WordPress on your machine and get going.
Once you have Xampp setup, you can install a new instance of WP for development for your clients in 5 minutes.
Now, I’d be remiss if I didn’t also mention Desktop Server by the awesome people at ServerPress. There’s a lite version for free, but I’ve had my eye on the Premium $50 version for quite some time. Besides having pushbutton WP install instances, I’m told there’s this super simple way to export your local development environment to a live server really seemlessly. It’s just $50, so it’s on my shortlist of items to get, but man… I’ve got a LONG shortlist of cool tools.
Turn on WordPress Debugging
Brad linked to the Codex (aka WP Developers Holy Scripture), but I’ll make it easy for you. Just copy and paste WP’s sample debugging code into your wp-config.php file. Here it is:
 // Enable WP_DEBUG mode
define('WP_DEBUG', true);

// Enable Debug logging to the /wp-content/debug.log file
define('WP_DEBUG_LOG', true);

// Disable display of errors and warnings
define('WP_DEBUG_DISPLAY', false);
@ini_set('display_errors',0);

// Use dev versions of core JS and CSS files (only needed if you are modifying these core files)
define('SCRIPT_DEBUG', true);
Choose which source control to use
Brad’s article goes into great detail about why source control is so important. For me, I’m CERTAIN I’m going to mess stuff up. You might have read my previous article about my paranoia of losing my thesis, so I created a recursive backup system with a wide conglomeration of free online tools. A friend of mine pointed out that I could have just used Git instead. I didn’t really know Git (waaaaay back then, which was March of this year) and I didn’t want to set my command line to “watch” a folder every time I went to edit my thesis. But for this kind of project with SOOO many different files Git is the way to go for sure.
I’m on a Windows machine (another reason why code hipsters might hate me), and setting up Git is not really straight-forward. Shout out to Alex Vasquez for recommending SmartGitHG. It makes setting up Git on a Windows machine really easy, as well as cloning projects, branching, forking, merging, pushing and everything else that I’m still learning how to do with it.
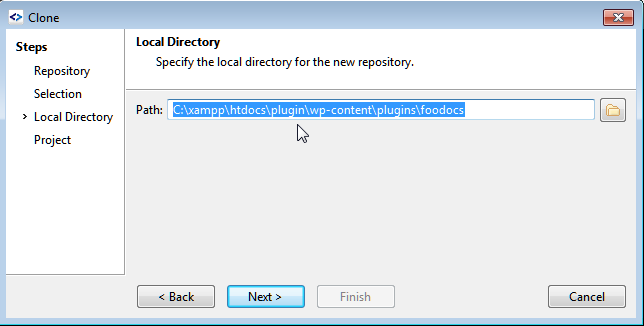
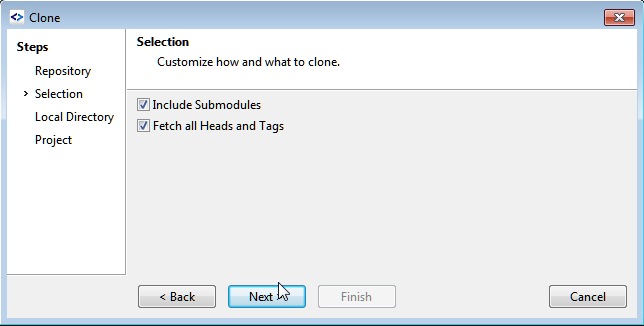
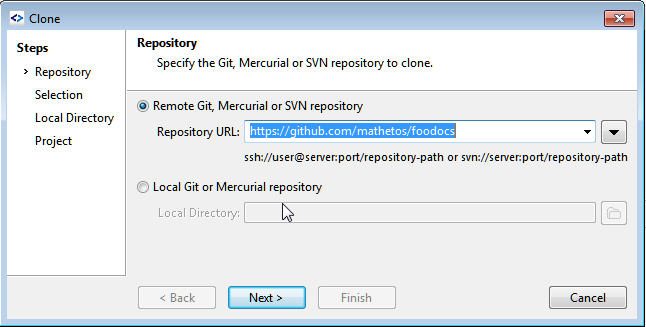
Now, in order to have your developing plugin be watched and uploaded to your Master in GitHub, you need to tell SmartGitHG to watch your plugin folder in Xampp. Since I already branched a plugin framework that Brad had created in Github, I wanted to clone that into my xampp directory. Of course if you are starting from your local and pushing to Github later, you’ll want to create your plugin folder first, add the basic files, and commit it to GitHub later.
For me, here’s a step-by-step screenshot of how I did this with SmartGitHG.
Cool. So now I’ve got a local install of WP to test the plugin on, and I’ve got it being versioned with SmartGitHG.
Learn WordPress Core Concepts
This is a big “step”. It’s really hardly a step. You’re not really going to DO this before building your plugin. In my book, this is part and parcel of what it means to be a developer of any kind. You have to always be striving to be more standards compliant, more efficient, more lean. This is the same in musicianship, in adult learning, in exercise… basically: it’s life. If you don’t want to build a plugin that conforms to WordPress standards as best as possible, then you’re not really ready to build period.
Quick aside: I watched this great little documentary called “Watermark“. It’s about young swimmers training for the olympics. I watched it with my 6 year old daughter because she’s learning to swim and really liking it. The majority of this coaches coaching philosophy is to train his swimmers for life. He talks to them about challenging themselves, pushing their boundaries, dealing with pain and disappointment. It made me think: Swimming is never just swimming. Gardening is never just gardening. Developing is never just developing. All of these things are personal challenges and mini life lessons where we have the chance to excel or fail. Either way, we can learn or stumble along as if it doesn’t matter. I choose to learn.
In that vein, Brad listed some really great and specific articles for learning coding standards specifically with WordPress in mind. Here’s a couple of my go-to’s when it comes to learning new stuff in general:
PHP for Absolute Beginners — this for me is all the detail and hand-holding I need for PHP stuff.
Codeschool — Not a free option, but these guys do serious courses that actually, really teach you what you need to learn. They also have a fun badge system for completing tests and courses.
Udemy — There’s some free resources here, but the paid stuff that I’ve experienced are really great too. Some quality course developers continue to expand and improve the course, so you get new and updated information even if you’ve already done the whole course. Worth a look.
Paulund — this guy has sooo much really targeted tutorials for WordPress. Often when I’m stuck and search something on Google, he’s got at least one article in the top results.
Choose a good IDE

An IDE is an “integrated development environment”. In web development there are those who use Dreamweaver, and those who code. Back in the day, if someone asked you “How do you build websites?” and your answer was anything besides Notepad and Photoshop, then you were put in a box — and not a pretty box. And heaven forbid you used Dreamweaver! “Whoah! That horrible, bloated, buggy thing!?”, people would mock. Well, DW got a few things really right that Notepad would never touch. Like a snippet manager, syntax highlighting, versioning, built-in FTP with user lock-out. Those are solid features. But we code hipsters don’t compromise ;-)
In stepped tools like Notepad+, then Notepad++, Mac hipsters got Coda, then SublimeText. Brad mentions several others that are much more programming oriented. Personally, I use Notepad++ daily. I really like it a lot. But for this, Brad suggested SublimeText which is also amazing, so I’ll be using that.
Setup IDE Debugging
I’m never a slouch when it comes to recommended instructions, especially coming from a pro like Brad. So I’m going to work against my inclination to say “Ah… it’ll be fine” and go ahead and setup IDE debugging for SublimeText. Luckily, they have an awesome plugin for that which makes it pretty cut and dry
{…an inordinate amount of time later…}
um, wait a second. I seriously can’t get this running right. Well, there you go. I’m a slouch and I’m not going to have IDE debugging. Luckily Brad said this is “optional”. Love to hear anyone give me what’s for in the comments on how to get this up and running.
Heads up for Next Week
So, Brad and I are jumping straight into coding our plugin next week. We’re calling it FooDocs (patent pending, trademarked, copyrighted… wait, no it’ll be GPL. Damn.). The first step is just setting up a plugin to create Custom Post Types. We front-end developers know our way around that handy functions.php file and create CPT’s like nobody’s business. But we do that because we’re selfish jerks. Once our customers switch to a new shiny theme (and yes, they will ditch your theme sooner than you’d like) your CPT’s that they built their site with are gone too. Then they hate you. This is why we need plugins, and CPT’s should be built with plugins and not themes. I think that’s pretty straight forward.
So, next week’s gonna be fun. See ya then!
You’re not alone in giving up on the debugging part. Spent hours trying to get it working and I didn’t manage it. I still really want to have debugging working with Sublime though, so any step by step tutorial would be very welcome.
Hi Jean. Thanks for the sublime feeling of schadenfreude! Feels good to not be alone. But, since I know others want it to I’ll take a stab at it again this week and hopefully do a quick follow-up post on how I did it. We’ll see…
Hi there friends, how is everything, and what you desire to say on the topic
of this piece of writing, in my view its actually remarkable
designed for me.